Skilled Groups allow assigning multiple documents to a group of users and monitor their progress, all in one place. It also provides an efficient way to ensure new users are tasked with reading a collection of documents in one operation, by simply adding them to an existing skilled group.
iPassport automatically issues the tasks to the staff members of a skilled group when appropriate, according to the ‘Skilled task settings’ of the OUs where the documents reside. This includes re-issuing tasks if a new version of a document is released or if it was in draft state when added to the skilled group and subsequently authorised. The system will not send a new task to a user if they are already skilled on a particular document version but it still counts them in the group for the other documents and then for all documents, when skilled tasks are next reissued.
A skilled group can have users and documents from different OUs but permissions have to be in place for all staff members to be able to access all of the documents they are tasked to read. When appropriate, the iPassport feature, ’Document Sharing’ offers a powerful tool to allow users access to specific documents in other OUs without having to be members of user groups of other departments.
| Note |
Example To illustrate, let’s suppose a new user joins an organisation as a lab technician in the Microbiology Lab. This person will probably have to read a set of documents that all new recruits must read (general company policies, employee handbook, etc). In addition, there will probably be a set of technical procedures and manuals, specific to the microbiology lab that the staff in that department must read to do their job properly. Three elements are required:
Upon adding the new user to the system, they should be added to the two user groups and the two skilled groups above. The system will take care of issuing skilled tasks, notified by email and easily accessible within iPassport, for each of the documents in both of the skilled groups. A personnel manager or supervisor with access to the user’s home OU (most likely, Microbiology Lab) will be able to keep track of the new user’s progress from several locations within the system. The user will also be able to access an overview of their personal skills in their own staff profile. NOTE: Having the Home OU, Microbiology Lab alone won’t provide permissions for the user to view documents in that OU. The user needs to be a member of the user group, Microbiology Docs to be able to view the relevant documents. |
Skilled Groups area
The Skilled Group area is reached by navigating to Competency > Skilled Groups
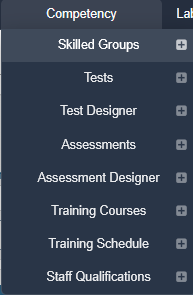
There are up to six tabs within the Skilled Groups sub-menu option; which tabs are shown depends on the user’s permissions. These are:
- List Skilled Groups
- New Skilled Group (requires ‘Skilled Groups:Manage Skilled Groups’)
- Skill Verification (this links to another article; requires ‘Skilled Staff:Verify Skill’)
- Verification History (this links to another article; requires ‘Skilled Staff:Verify Skill’)
- Skill Verifiers (this links to another article; requires ‘Skilled Groups:Can Manage Skill Verifiers’)
- Reports (Here you can download reports of the Users/Documents within each group; requires ‘Skilled Groups:Create Reports’.)

List Skilled Groups
The tab, List Skilled Groups opens by default. It has a general Search filter to enter (even partially) the name or code of a skilled group. There are search filters that allow looking for skilled groups which include a particular User and/or a particular Controlled Document. There is also a filter for Private/Public skilled groups. Enterprise accounts also have a Facility filter.
The results of any search are displayed below and they can be exported as a CSV spreadsheet by clicking Export Groups. The results list shows the Name, Code, whether the group is Private and the number of Authorised Docs included in each skilled group. The report lists each document for each user, stating if the user is already skilled on that document or not.
Adding a Skilled Group
There is no limit on the number of groups that can be created.
To add a new skilled group:
- Go to Competency > Skilled Groups
- Click the tab, New Skilled Group (the plus [+] sign next to the Skilled Groups menu item is a shortcut to this page)
- A Name must be entered in the field provided
It should be as descriptive as possible, for example, “Site wide Health & Safety policies”. - A Code is also required in the field provided
It is a free text field but iPassport does perform a validation check to prevent adding already existing codes. This acts as a second unique identifier for the record. (The Name must also be unique; a skilled group cannot be saved with the same Name or Code as another skilled group in the account.) - If appropriate, the group can be made private by ticking the checkbox under, Set as Private
When the checkbox is ticked, a new filter appears to set an OU Scope (this filter is otherwise not visible). The group will only be listed for users who have access to at least one of the OU(s) selected (if no OU Scope is set, it is listed for all users who can view skilled groups); this also applies to the creator. Only the creator and users with permission to edit private skilled groups ("Skilled Groups:Can Edit Private Skilled Groups") in the OU(s) selected will be able to open it or edit it. Other users that click on it to open it will see the message, “This group is private and it is owned by …, only the owner of the group can view it”. - Details can be entered as free text to describe the nature of the skilled group
- Click Save to complete the creation stage

Adding Users to the Skilled Group
Once a group has been created, staff and documents can be added to it.

To add staff to the skilled group:
- Click the Users tab
(The tab also displays a count of the staff currently added, in brackets - Users(2).)
- Click the (+) Add User option, on the right of the header area of the Users list (this option requires the permission, ‘Skilled Staff:Add Skilled Staff’)
This should open a pop-up window to select users and create skilled tasks for them.
- Select users from distribution lists (Distribution lists to send this task to) and/or individual users (Users to send this task to) by ticking the appropriate checkboxes next to any of the available choices in both filters provided. For enterprise accounts, the list will only include staff who have ‘Home OUs’ that the user has access to; for other accounts, all active standard users who are not already in the skilled group are listed. Members of distribution lists can be viewed by hovering over them.
Warning When a distribution list is used to add members to a skilled group, the two become permanently linked.
Please refer to the section, "Distribution Lists used in Skilled Groups" of the article, "Uses Of Distribution Lists".
To find out if a skilled group is linked to a distribution list, under the 'Users' tab of the skilled group, click '+ Add User' and any linked distribution lists will be quoted in the header area of the pop-up window.Note If a user is a member of multiple distribution lists selected and/or is also selected as an individual, the system will only add them once to the skilled group. - Tick the checkbox under Add users(s) as already skilled if the users being added are not required to complete a skill confirmation task for the current version of any of the documents listed in the skilled group. They will be added with status, ‘Confirmed’, in each document’s Skilled tab and they will be issued skilled tasks when a new version of the document is published or if it must be re-read periodically.
This only applies to authorised documents: for any documents in the skilled group that are in Draft or Pending Authorisation, the users are added as not skilled and a skilled task is prepared, to be issued once the document is authorised.
When this checkbox is ticked, the Due Date, Active Date, Make this task private, Priority and Description fields are hidden and the button at the bottom of the pop-up changes to Add User(s).Note If any users added as skilled already had a skilled task to complete for any of the documents, the system will not grant them the ‘skill’ until they complete the task.
Skills which are granted automatically when this option is ticked, will also appear in the Tasks tab of the skilled group with a comment that the person was added as ‘Trained’. - The overall OU Setting, “Time interval for Due Date on system reissued skilled tasks” (described in the guide, Permissions & Settings), can be overridden by selecting a different date in the future from the pop-up calendar in the field, Due Date (a Due Date in the past is not accepted)
- If the field, Active Date is left blank, the associated skilled task will be sent out immediately (if the document is authorised); to set a different date (in the future), click in the field and select one from the calendar that pops up. The Active Date cannot be after the Due Date; if a date in the past is selected, it is ignored and the task is issued immediately
Note It is not possible to be skilled on a ‘Draft’ document. When staff is added to a document in Draft state, the skilled task is prepared but not issued until the document is authorised.
If the document is already authorised, the task is normally issued immediately.
However, if an ‘Active Date’ is set in the future, then the skilled task will be held until the activation date is reached. - The task can be made private by ticking the checkbox under, “Make this task private” so that only the creator and recipient can view it
- A Priority can be set for this task; the choices are, Low, Medium, High and URGENT; the default is, Low
- The Description field constitutes the body of the email that the tasked user will receive; free text can be entered as required
Please note that, by default, users receive a single summary email listing all the documents they need to read, which does not include this text. The individual task email containing the Description is only sent to users who have unticked their user preference, “Group new skilled/reading task notifications into a single summary email where possible”.Note Text entered here will appear in the task reminder box which appears under the General tab of the document records the user is tasked to read: 
Custom messages can only be entered for the first time tasks are issued to staff members when they are added to the group. Subsequent tasks, reissued manually or automatically (when a new version is authorised or the time interval to reissue the task lapses), will contain standard text generated by the system. - Scroll down and click Create Task(s) (or Add User(s) if the users are being added as already skilled) to finish
Removing Users
A user can be removed from a skilled group by clicking the trash/bin icon in the Actions column of the Users list, under the Users tab (this requires the permission, ‘Skilled Staff:Delete Skilled Staff’). Any outstanding skilled tasks generated by the skilled group will be invalidated but the user will not lose already confirmed skills. However, if a document is also in another skilled group that the user still belongs to, the outstanding skilled task for that document is kept.
Adding Documents to the Skilled Group
To add documents to a skilled group:
- Click the Documents tab (The tab also displays a count of authorised documents currently added, in brackets - Documents(2).)

- Click (+) Add Documents, on the right of the header area of the Documents list (this requires the permissions, ‘Skilled Staff:Add Skilled Staff’ and ‘Skilled Groups:Manage Skilled Groups’)

- Use the filters available to search and bring up the documents of interest
There is a general Search filter to enter (even partially) the name or code of a document. The Organisational Units filter will bring up all available documents in the OU selected. There are also filters to refine the search by document Category, Status or Type.Info A user is only able to add documents that reside in an OU they have access to. - Once a document has been located, click its plus (+) sign in the Actions column to add it
- If adjustments need to be made to the task details, the section, Enter Task Details in here can be expanded
It includes fields to set a different Due Date and/or Active Date, Make this task private, adjust the Priority and edit the body of the email in the Description field. Information about these parameters can be found above. As in other areas, these details will only apply to the task being set and subsequent tasks will follow default settings, according to standing OU Preferences.
- If the members of the group are not required to complete a skill confirmation task for the documents being added, tick the checkbox, Add users(s) as already skilled in the pop-up; the users will be added to the skilled list on all authorised documents in the group and no reading tasks will be issued at this time
- When done adding documents and details, click Close and Refresh
The skilled tasks are added in the background, so it can take a few minutes before all skills are added.
For all documents added, unless an Active Date was added or the document is not yet authorised, skilled tasks will be issued immediately to all the members of the group who are not yet skilled on the current version of each document. These tasks and associated skills will also appear in the document records’ Tasks and Skills tabs. Both tabs are also found in each individual’s staff profile. The tasks can also be tracked in the Tasks > Users Tasks area and users will see tasks assigned to them in the My Tasks areas. Please see, Viewing Skills & Skilled Tasks for more information.
Permission Check
It is possible to add documents that not all members of the user group can access. When this happens, the user will be notified about the task but won’t be able to open the document assigned. This leads to having to delete the task or granting access to the user through permissions or by sharing the document.
Clicking Permission Check, performs a validation of users’ permissions to access every document in the group. If any document can’t be accessed by any of the members of the group, it will be flagged with a yellow warning triangle. Hover over the document’s row to invoke a pop-up list of those users who can’t access that particular document.
A Permission Check option is also available under the Users tab. Any user who cannot access one or more of the documents in the group is flagged with a warning triangle; hover over it to see a list of the documents that user can’t access. Users who can access all of the documents are shown with a green tick.

Overriding Permissions
There is a preference which when enabled grants automatic read-only access to users who have been assigned documents they don’t have permission to view. It’s called, “Allow users with a skilled task to view authorised controlled documents without explicit permissions.”, and details about its use are found in the previous article, ‘Skilled Settings’, under ‘Document Control’.
Other ways of adding/removing users and documents
Given permissions are in place, skilled groups can also be managed from user records and from document records.
Adding Users from their user records to Skilled Groups
New users can be added to skilled groups when their user record is being created. Skilled group membership can also be managed from a user’s record at any time. Details can be found in the user guide, User Management.
Adding Documents from their ‘Skilled’ tab to Skilled Groups
Documents can also be added to skilled groups from within the document itself, under the Skilled tab. The same permission required to manage skilled groups applies (‘Skilled Groups:Manage Skilled Groups’).

To add a document from its Skilled tab to a skilled group:
- Open the document
- Click its Skilled tab
- Click the button, ‘Manage Skilled Groups’
- In the pop-up window, tick/untick the skilled groups in which the document should/shouldn’t be included

- Click Save
It can take a short while for the tasks to be generated in the background so a message pops up to explain why no users have been automatically added below.
- Click the ‘Skilled’ tab to refresh the page and view the new list of skilled staff members
| Note |
| It’s important to be aware that many tasks can be created from performing changes to skilled groups. Planning the number of documents per skilled group and staggering their scheduling can help manage staff workload. |
Reports
The 'Reports' tab in the Skilled Groups area provides simple reports: ‘Skilled Groups With Documents’ and ‘Skilled Groups With Users’, which separately list the documents or the users in each skilled group, and ‘Skilled Groups’, which lists the skilled group names only. The default layout lists each skilled group’s name together with its users and documents. They are available in PDF or CSV format.
Similar CSV reports can be produced for individual skilled groups under their 'Users' tab ('Export Users List') and 'Documents' tab ('Export Document List').
The Action, 'Print Group' also provides PDF and CSV options and produces a comprehensive report which lists each document against each user and their 'skill status'.
Next Step:
The next article covers Viewing Skills & Skilled Tasks
Previous Step:
The previous article covers Importing Skilled Staff in Bulk
Was this article helpful?
That’s Great!
Thank you for your feedback
Sorry! We couldn't be helpful
Thank you for your feedback
Feedback sent
We appreciate your effort and will try to fix the article