Viewing Documents Used by a Workflow
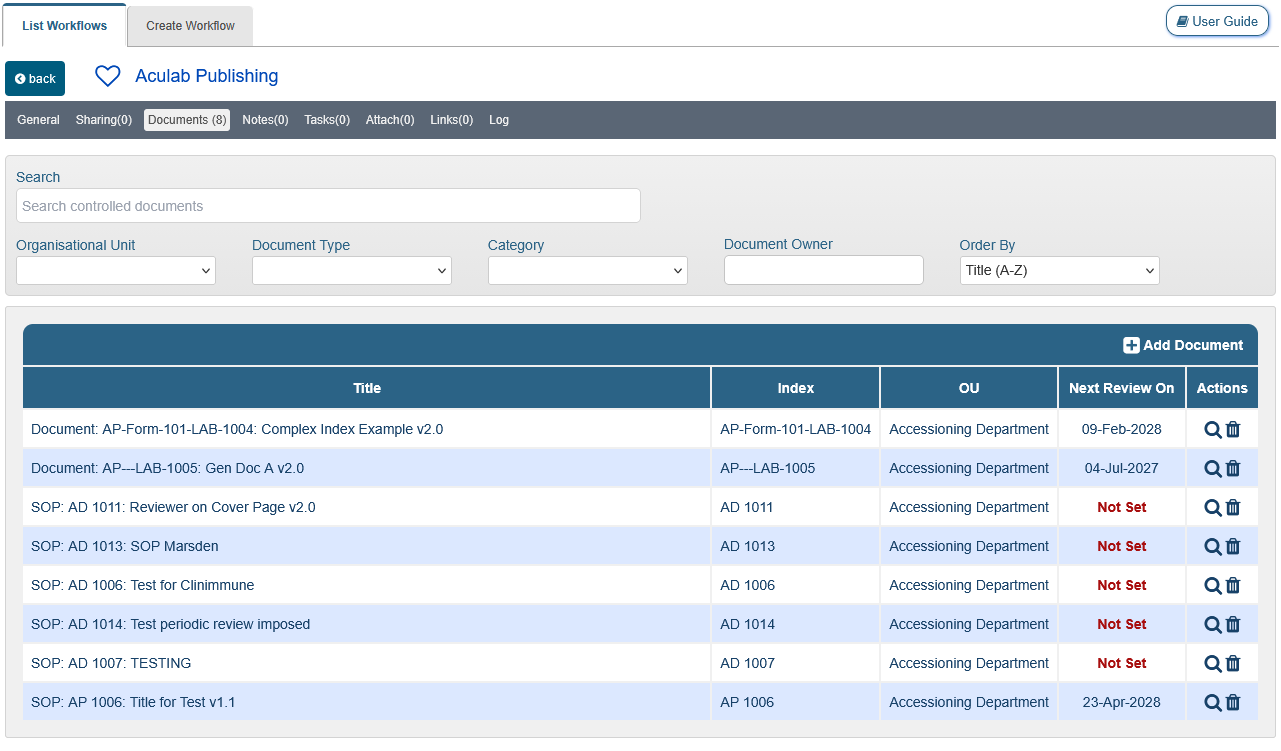
Every controlled document workflow record, review or publishing, has a Documents (n) tab where documents used by it are listed. The number in parenthesis, “(n)”, next to the tab name indicates how many documents are currently using that workflow, so on a publishing workflow record it counts the documents using that publishing workflow. Only the latest version of each document is counted, so a document that exists as both a draft and an authorised version is counted once.
This tab has a search area to help locate any individual document. It offers six filters: Search (free text), Organisational Unit, Document Type, Category, Document Owner and Order By (Title A-Z, Title Z-A, Index A-Z, Index Z-A). The search re-runs as soon as any of them is changed.
Clicking the row of any document will navigate to that record. The Actions column of the same list also carries a magnifier icon which opens the document.
Assigning Documents from a Workflow
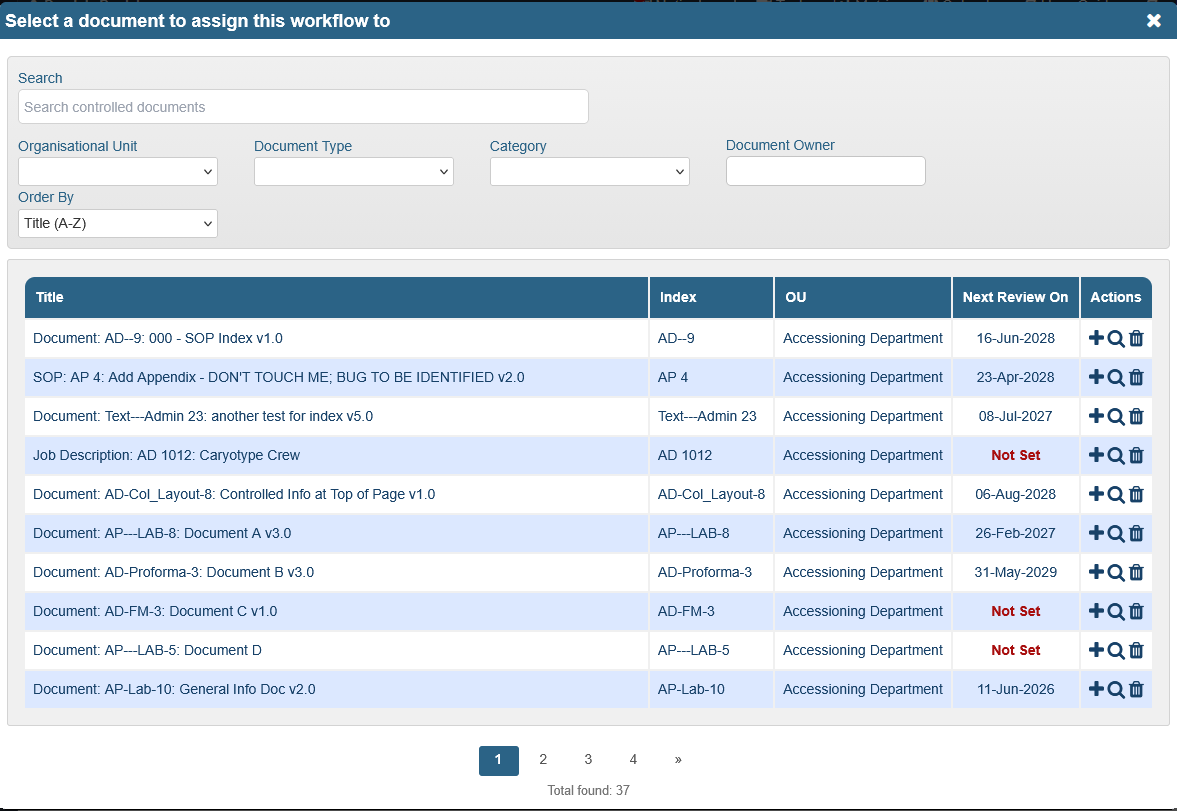
The Documents tab allows applying a workflow to individual documents. Availability of the workflow in the OU where the document resides is only one of the conditions the Add Document list applies, so a document which meets it can still be absent from that list. The list also excludes:
- documents which already use this workflow;
- documents which have a newer version, as only the latest version of a document is offered;
- documents whose OU has a default workflow of that type both set and locked in the Organisational Unit Preferences.
To assign a document from within a workflow record:
- Find and open the workflow by navigating to Administration > Workflows > List Workflows
- Click the Documents tab
- Click [+]Add Document in the top right corner of the document list area
- Use the search filters in the pop-up window that appears to locate the document to add
- When the document appears listed below, click its plus sign (+) in the Actions column to add it to the list of documents which use this workflow
- Click the ‘X’ in the top right corner of the pop-up window to close it when finished
| Note - PERMISSIONS |
| The [+]Add Document link is shown in the tab header to everyone who can see the workflow, but opening it requires the ‘Workflows:Create/Edit Controlled Document Workflows’ permission. A user who holds only ‘Workflows:View Controlled Document Workflows’ will see the link and receive a no-access message on clicking it. Likewise, the plus sign (+) on a document row is shown when the user can edit that document (‘<document type>:Edit <document type>’), but saving the addition is checked against ‘<document type>:Create <document type>’ instead. Those are two different permissions, so it is possible to see the plus sign and still receive a no-access message on clicking it. |
| Note |
| Clicking the row of any document will navigate to that record. The confirmation dialogue (“You are about to navigate away from this screen to view the document. Do you want to continue?") is not shown everywhere: it appears in the Add Document pop-up list, and only for documents the user has permission to edit. Every row in the workflow’s own Documents tab already uses the workflow, so clicking a row there navigates straight to the document with no dialogue. |
| Important Note - ENABLING PERIODIC REVIEWS |
|---|
| There is one functional difference between assigning review workflows to documents from within a workflow or from the Controlled Documents search area (described below). When the document's Review Settings checkbox next to 'Require periodic review of this document' is un-ticked and a yellow triangle is displayed over the 'Review Settings' button, then:
|
Assigning Workflows to Multiple Documents from the Controlled Documents Search area
It is also possible to select multiple documents in the controlled documents Search tab and apply a given workflow to them.
To assign a workflow to multiple documents:
- Navigate to the Laboratory Records > Controlled Documents > Search tab
- Perform a search to bring up the documents of interest (e.g., all the authorised SOPs in one OU)
- Select files -
- Select all documents by ticking the checkbox on the left in the search results header area
- Alternatively, select documents individually by ticking their checkbox in the left column
- Click the button, + Assign Workflow which appears above the search results, on the right, once at least one document has been selected
- Select the Workflow Type - review or publishing workflow
- Read the messages to confirm that no document will be adversely affected (any ongoing workflows will be restarted)
- Select the workflow to apply to all the selected documents in the field, Select Workflow
- Click Save
Saving does not necessarily assign the workflow to every document that was selected. A document is skipped when it resides in an OU the workflow is not available in, when a workflow of that type is locked for its OU in the Organisational Unit Preferences, or when the user does not have permission to change its workflow settings. A results panel then names whatever was skipped: ‘The workflow was not assigned to the following items because this workflow is not available in the OUs where those items reside or the Organisational Unit Preferences prevent changing the workflow.’, followed by the list of items. Where nothing was skipped, the panel confirms ‘Workflow assigned successfully.’ instead. Always read this panel rather than assuming every selected document was updated.
| Note - PERMISSIONS |
| The + Assign Workflow button is only shown to a user who holds the ‘<document type>:Schedule Reviews’ permission in at least one OU, and the multi-select checkbox column itself is hidden from a user who holds none of the bulk-action permissions. The same permission is checked again when Save is clicked, so a user without it receives a no-access message. |
| Note - TWO SEARCH INTERFACES |
| Some accounts have a second, newer Controlled Documents search available. Where it is enabled, a ‘Try the New Search (Beta)’ checkbox appears in the search filter area and switches that user between the two interfaces; the choice is remembered per user, per account, in the browser. The new interface is a different screen, with sortable and resizable columns, a ‘Reset columns’ control and an infinite-scroll option, so the search results will not look like the ones described above. Assign Workflow opens the same window in both interfaces, so steps 4 to 8 apply either way. |
Removing Documents in Publishing Workflows
Documents can be removed in the publishing workflows Documents tab. A trash/bin icon is available in the Actions column of the list in the Documents tab. Clicking it will bring up a warning - ‘When this document is removed from the workflow it will have to be authorised/published manually.’. Once the button, ‘Remove Document’ is clicked, it disappears from the list and the publishing settings for the document will be, ‘None (manual authorisation)’. Documents with locked publishing workflows can’t be removed from the list. Review workflows don’t offer this function.
| Important Note - REMOVING A DOCUMENT WHICH IS CURRENTLY BEING PUBLISHED |
|---|
| Where the publishing workflow is in progress for that document, a second warning is shown alongside the first: ‘This document is currently being published. If you remove it from this workflow it will be reverted to draft and all current authorisation requests will be deleted.’ This is considerably more than a change of publishing setting, and it cannot be undone. Clicking ‘Remove Document’ at this point will:
|
This is the last article in this user guide.
Previous Step:
The previous article covers Sharing Workflows with other OUs
Was this article helpful?
That’s Great!
Thank you for your feedback
Sorry! We couldn't be helpful
Thank you for your feedback
Feedback sent
We appreciate your effort and will try to fix the article