Creating a Training Event
Once a training course has been created, it can be used to schedule training events.

To schedule training events:
- Navigate to Competency > Training Schedule > New Training Event (or click the plus (+) sign next to Training Schedule as a shortcut)
- Select a Training Course from the options in the dropdown menu
A training course is required to create a new training event. All details from the training course will be entered into this training event. A user can then change specific details for the event without altering the training course. - Check if Attendance is compulsory or leave unchecked if its not
This field is optional and can be edited under the Attendees tab once the training event has been created. - The field, Cost (Per Person), should populate with a set price when a training course is selected; if nothing is set then a user can add the cost of the training event here
This field is optional and can be edited under the General tab once the training event has been created. - The Start Date can be easily selected from the pop-up calendar which appears when you click in the field; it uses the format of DD-MMM-YYYY
This is a required field. - The Start Time has two dropdown menus to select the ‘hours’ and ‘minutes’ of the time when the course will start
This is a required field; it defaults to 00:00 if not changed and can be edited under the General tab once the training event has been created. - The Trainers field doesn’t allow adding text; it only lists contacts who are declared as “Trainers” in their contact record and who are members of the Training Company set to provide this training
This field is optional and can be edited under the Trainers tab once the training event has been created. - Candidates can be invited by selecting groups from one or both of the filters, ‘Assign to all Staff Members in:’ (the selected OUs) and ‘Assign to distribution lists:’
These fields are optional at this stage but once the training event has been created, attendees can only be added as individuals (and not in groups like this, based on Home OU or Distribution List membership). Attendees selected this way are added in the background shortly after the event is created, so if any are missing from the Attendees tab straight after creation, reload the tab. Disabled staff members are not added. The attendance tasks sent to these attendees are private and are due on the event’s Start Date (no due date is set if the Start Date is in the past). - Click Create Training Event to finish

Attendees Tab
The attendees tab allows editing the Attendance option (whether it’s compulsory or not) and allows adding or removing attendees. It also provides information about the candidates’ attendance (Confirmed, Pending, Unknown). If an attendee’s task has a future Active Date, their status shows as Pending: Active on followed by that date.

To adjust the attendance option:
- Click the edit (pencil) icon under Attendance
- Tick or untick the checkbox by, “Attendance is Compulsory” as required
- Click Save
To add attendees to the training event:
- Click the (+)Add Attendees link in the top right corner of the attendees list
- In the Add Attendee pop-up window that appears -
- Find and select Users to send this task to
The search-as-you-type filter helps locating users and it’s also possible to just scroll down the list. Tick the checkbox by the name of each selected attendee - A Due Date can be selected from the pop-up calendar; if left blank, the task will have no due date
- If required, the task can be made private by ticking the checkbox under, “Make this task private”
- Other users can be notified of this task (but not be invited to the event) by ticking the checkbox next to, “Copy users into this task?”; a search-as-you-type filter will appear to add users
- If the field, Active Date is left blank, the task will be issued immediately; to postpone releasing the task, select a date in the future from the pop-up calendar which appears by clicking in the field
- A Priority can be set for the task (Low, Medium, High or URGENT)
- Standard text is included in the Description field and it can be edited but it can’t be left blank
- Click Add Attendees

The attendee(s) will be added to the list with the status, Pending. Staff members who don’t have a user account are not sent a task, so their status shows as Unknown.
Clicking a magnifying glass in the Actions column of the Attendees tab list, will jump to the corresponding user’s Staff Profile (please see below).
To remove an attendee from the list, click the trash/bin icon in the Actions column and confirm when prompted. The attendee’s task is deleted, they are sent a cancellation email, and any linked staff review objectives for the training course are set to cancelled. The training event will also be removed from the user’s staff profile.
Confirming Attendance on Training Courses
The users selected will be sent an individual task asking them to confirm that they will attend the event.
The quickest route is to find the task by clicking the left sidebar menu, My Tasks.
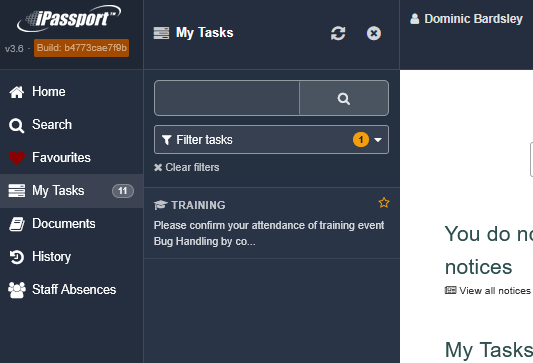
Clicking the task in the sidebar, opens a pop-up window where the candidate has two options - Delete Task or Complete Task.

If the user clicks the Complete Task button, a Complete Task: Please confirm your attendance pop-up window will appear. Completion notes can be entered now or once the task has been completed. Click Complete Task to confirm attendance, or click the X in the top right corner to close the pop-up window.

The attendee’s status will change to, Confirmed. If the user clicks the Delete Task button, their status will change to, Unknown.
Cancel Training Event
Before the training event is completed it is still in an editable state and it can be cancelled.
The Actions dropdown menu on a training event is only available to users with the permission, “Training Events:Complete Training Events”. The Cancel Training Event option also requires the permission, “Training Events:Cancel Training Events”.
From the Actions dropdown menu, select, Cancel Training Event and click Go.

The training event status will change to, Cancelled and any pending tasks will be deleted, making the attendees’ status, Unknown. The event will still be visible for future reference.
Delete Training Event
The permissions, “Records:Delete Records” and “Training Events:Complete Training Events” (which is needed to see the Actions dropdown menu) are required to make this option available. When deleted, the event is completely removed from Training Schedule lists and all of the event’s tasks are deleted too.
From the Actions dropdown menu, select, Delete this Training Event and click Go.
A confirmation pop-up window will warn that the deletion is permanent and cannot be undone. Enter a Reason For Deletion (this is required; the deletion won’t go ahead if it is left blank) and click Delete Permanently.

Set Training Event as Completed
Once the training event has taken place and candidates have confirmed their attendance, the training event can be Set as Completed from the Actions dropdown menu.
When the event is set as completed, any attendance tasks that have not yet been completed are deleted, and any linked staff review objectives for the training course are marked as completed.
Completed training events can’t be edited.

Re-Open Training Event
It is possible to re-open a completed or cancelled training event if required. This operation allows editing parameters and information after the event has taken place. The same process applies - select Re-Open from the Actions menu and click Go. In the Reason for re-opening the event pop-up window, enter a Reason and click Save; the reason is recorded in the event’s change log. Re-opening a cancelled event also removes its Cancelled status.

Staff Profile
Training events are also found under each user’s Staff Profile, under the Training tab.
Clicking the magnifying glass in the Actions column of the Training tab list will jump to the corresponding training event’s General tab.
The Training tab has a filter to view Completed or Scheduled events. Completed is shown by default and lists training events that have been set as completed, as well as events where the user has confirmed their attendance even if the event hasn’t been completed yet. Cancelled training events don’t appear in either view.
The list can be exported in CSV format by clicking, Export Training.

Search Training Events
The List Training Schedule tab offers a search area to find training events.

The following search filters are available in this area:
- Search - this is a free text field which searches for details in the ‘Name’ and ‘Course Overview’ fields of training events
- Facility - (enterprise accounts only) this defaults to the user’s own facility and limits the Trainer and Attendee options to that facility
- Location - this also a free text which will search all the address fields (including address notes) in training events
- Trainer - this is a smart ‘search-as-you-type’ field which will search the list of contacts
- Attendee - this is also a smart ‘search-as-you-type’ field which will search the list of users
- Date, is after, is before - a date range can be set to narrow down the search, based on the Date options, ‘Completed On’ or ‘Start Date’
The results can be exported in CSV format by clicking, Export List.
This is the last article in this user guide.
Previous step:
The previous article covers Creating Courses
Was this article helpful?
That’s Great!
Thank you for your feedback
Sorry! We couldn't be helpful
Thank you for your feedback
Feedback sent
We appreciate your effort and will try to fix the article